Saturday 26 January 2013

The Very Easy Caterpillar

The Very Easy Caterpillar by Feminist Cupcakes
I probably should have ironed this before taking photos. And maybe cleaned the rug.

I made the most adorable t-shirt for Jack this evening. I found the idea here, via Pinterest (where else?), to make a Very Hungry Caterpillar from buttons. I've been meaning to get around to it for ages but I didn't have any buttons, so when I was at my mother-in-law's house this afternoon I asked if she had any red and green buttons I could have. She has several plastic bags full of buttons, so I wasn't too surprised when I found what I was looking for.

This is the easiest thing I've ever made. You just sew on the buttons and use black embroidery thread for the antennae. I can't wait to see how it looks on Jack tomorrow.


The Very Easy Caterpillar by Feminist Cupcakes

Thursday 24 January 2013

Pinterest And Pyjamas

As I mentioned in this post about Lego, I don't do sewing; the bags I made for that project was the first time I had ever used a sewing machine. When I saw this post from Pinstrosity challenging their readers to actually do a project they have pinned I figured I'd give it a shot.

I decided to make a pair of pyjamas for Jack. I used this tutorial from My Cotton Creations, and I used a gorgeously soft and fluffy fleece fabric (with a very cute dinosaur print!).

Pinterest And Pyjamas by Feminist Cupcakes

I have to say, this tutorial is amazing. It's so easy to follow, even for a complete beginner like me. The only problem I had was hemming the bottom cuffs as they were so small! Next time I might hem them before I sew them up. With a bigger child it probably wouldn't be a problem though.

Pinterest And Pyjamas by Feminist Cupcakes
I'm not sure if one leg is actually longer than the other or if it's just the way they're laid out.

Pinterest And Pyjamas by Feminist Cupcakes
I need to clean my rug.
And here they are being worn!

Pinterest And Pyjamas by Feminist Cupcakes
His favourite AC/DC song is Dirty Deeds Done Dirt Cheap
I think they turned out really well! I figured seeing as I could do the bottoms I'd have a go at the top too. I used a free pattern from Melly Sews for the basic shape. It unfortunately doesn't come with any instructions on how to sew it together though, and being the complete novice that I am I had no idea what to do. Back to Pinterest to find a tutorial on how to put it all together. I found this great tutorial from Dana Made It on how to sew on sleeves, and this Craftstylish post on how to sew a neckline.

After stabbing myself in the hands with pins several dozen times, I got it finished without bleeding all over it!

Pinterest And Pyjamas by Feminist Cupcakes
Maybe I should have picked up the fabric scraps from the floor before I took a photo.


Pinterest And Pyjamas by Feminist Cupcakes

I don't know how well it shows in these pictures but I did have some problems with the armpits and the neckline is a little wide, but it isn't a problem on this top as Jack hates having tight neck holes pulled over his head.

I think overall this was a success. I'm very proud of myself for managing to make something wearable on my first try, and most importantly Jack loves them.

Pinterest And Pyjamas by Feminist Cupcakes
I cropped his head out intentionally. I'm not that bad with a camera.

Sunday 20 January 2013

Snowy Day Baking

This is how it looks outside my house today:

Snowy Day Baking by Feminist Cupcakes

At lunchtime I realised we had run out of bread, and as we live at the top of a steep hill which hadn't been gritted there was no way we could get to a shop to buy any more. Luckily I keep a huge stock of bread flour, so I made some of my own.

Snowy Day Baking by Feminist Cupcakes

Recipe:

This is so simple to make, but it does involve kneading. It's worth it though because it tastes amazing.

700g bread flour (plus extra for dusting)
2 teaspoons salt
1 7g sachet dried yeast
450 - 500 ml lukewarm water
Baking tray and baking paper

Put the flour and salt in a bowl and stir together. Add the yeast and stir again. Make a hollow in the centre of the bowl and pour in your water. I usually start with 450ml of water and add more once it's mixed in. I find it easier to add more water than more flour. An important thing to note about the temperature of the water is that if it's too cold the yeast won't activate and if it's too warm the yeast will die. I test the temperature by closing my eyes and dipping a couple of fingers in (get your minds out of the gutter!); if I can't tell how far in my fingers are, it's about right.

Before you start mixing in your water, make sure you remove any rings you're wearing because you're going to be doing this by hand. Just put your hands into the bowl, squish everything together and try to ignore how it feels. If you have flour or scraps of dough left at the bottom of your bowl, add a little more water and mix in. Sticky dough is better than very dry dough.

Once you've mixed it all in and you're happy with the consistency of your dough, turn it out onto a lightly floured work surface and knead it for ten minutes. Remember, sticky is good, so don't worry if it sticks to your hands and the worktop, just peel it off and stick it back to the dough.

When the dough is soft, smooth and stretchy put it in a mixing bowl and cover with a damp tea-towel. Leave it to rise at room temperature for about two hours. You can leave it in a warm room and it should take less time, but it probably won't taste as nice. You could probably even leave it to rise overnight in a fridge, but I've not tried it.

When your dough is fully risen it should have roughly doubled in size. To test it, poke a well floured finger into the centre of the dough. If the dough doesn't rise to fill the dent then it's done. With the dough still in the bowl, push down on it with your palms to get rid of the air. Tip it out and knead lightly for a minute or so and cut in half. Each half needs to be shaped into a round loaf. I do this by picking the dough up and turning it in my hands while tucking the sides underneath. I'm sorry if that isn't explained very well, I'll try and get a video of it, and maybe a video of how to knead too.

Once both loaves are shaped, put them on a sheet of baking paper the right size to fit the baking tray you're using, sprinkle with flour, cover with the damp tea-towel again and leave to rise for another hour.

Towards the end of the rising time put your oven on to preheat to 230C (450F or Gas Mark 8). I usually judge by how much the dough is risen, but roughly 40 minutes into it should be fine. While the oven is preheating, put a roasting tin on the bottom of the oven and the baking tray you intend to use on the top shelf (which should be roughly in the centre of the oven rather than right at the top.)

Once your dough has finished rising sprinkle on some more flour and slash the top of each loaf using a very sharp knife. Before you do anything else, run a mug of very cold water (I know it seems weird, but trust me). Remove your baking tray from the oven (make sure you close the oven door) and slide the baking paper with the loaves onto it. As quickly as you safely can, open the oven door, put the baking tray on the top shelf, pour the mug of cold water into the roasting tin at the bottom and shut the oven door. The cold water on the hot roasting tin creates a cloud of steam inside the oven which gives your bread a lovely chewy crust.

After a couple of minutes you need to turn your oven down to 200C (400F or Gas Mark 6) for 15 minutes. I usually use the couple of minutes to clean up the water that I've spilled all over the floor instead of in the roasting tin. After 15 minutes, turn your baking tray around to colour the bread evenly and turn the oven down again to 180C (350F or Gas Mark 4) and bake for a further 15 to 20 minutes. To check if the bread is done turn the loaf over and tap on the bottom. If it sounds hollow it's done! Leave on a cooling rack to cool competely, or do what I do and wait until it's just cool enough to touch, cut a nice thick slice and eat with lots of butter melting into it.

I also made some gorgeous oat and raisin cookies while waiting for my bread to rise. I used this recipe from Deb at Smitten Kitchen and it's the easiest cookie recipe I've ever used. The only adaptation I used was to replace the butter with a dairy free substitute. They taste incredible, but it's hardly surprising because every recipe I've tried from Smitten Kitchen has been amazing.

Snowy Day Baking by Feminist Cupcakes


Snowy Day Baking by Feminist Cupcakes
It's a pain in the arse, but it does look pretty.

Sunday 13 January 2013

Dairy Free Rainbow Cake

Dairy Free Rainbow Cake by Feminist Cupcakes


For his birthday Adam has asked for a rainbow cake covered in plain white sugarpaste that he can draw on with edible pens (like this one from Sweetapolita) and even though his birthday isn't until July I thought I should have a go at making it now so I have time to tweak the recipe if needed.

The recipe I used was originally a three layer chocolate cake, but I replaced the cocoa powder with extra flour and split the finished mixture into 6 parts rather than three. I've found that the most accurate way of doing this is to weigh the mixing bowl before you start, then again when you've added all the ingredients. Simply take away the original weight of the bowl and divide by as many layers as you want. In my case it worked out to 138 grams per layer. Once you've got the cake mix divided into separate bowls just add a different food colour to each bowl. For this to work properly you have to use the paste or gel food colours. The liquid ones are too runny to get a really vibrant colour. The ones I used were Sugarflair colours.

Dairy Free Rainbow Cake by Feminist Cupcakes
Tangerine and Christmas Red
Dairy Free Rainbow Cake by Feminist Cupcakes
Melon and Party Green
Dairy Free Rainbow Cake by Feminist Cupcakes
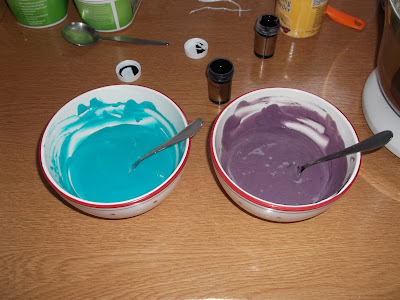
Ice Blue and Grape Violet

The colours of the cake mix will be pretty much the colour of the finished cake so make sure it's as bright as you want it.

Recipe:

100g dairy free margarine (at room temp)
260g caster sugar
2 eggs
1/4 teaspoon vanilla extract
3/4 teaspoon baking powder
3/4 teaspoon bicarbonate of soda (baking soda)
a pinch of salt
215g plain flour
160ml rice milk or other dairy free milk
20cm (8 inch) round shallow tins, greased and bases lined

Preheat your oven. I set mine at Gas Mark 3 (170C or 325F), but because the layers were so thin I think it probably should have been GM 2 (150C or 300F) and baked for a bit longer. Remember to weigh your bowl before you start too, it makes separating the mix so much easier.

Cream together the butter and sugar. Beat it on a fairly high speed for about 5 minutes until it's light and fluffy; it may take a minute or so longer as it's margarine instead of butter.

Add the eggs one at a time, beating thoroughly after each.

Turn your mixer down to slow and add the vanilla extract , 45 grams of the flour, the baking powder, bicarbonate of soda, and the salt and beat until well mixed. If you try and do this with the mixer still on high you will end up with a fine film of flour over everything in your kitchen. Trust me on this, turn the mixer down!

Add half of the remaining flour, all of the milk, then the last of the flour. Mix well until everything is combined.

Now you've reached the fun part! Weigh out your mix into six bowls (you did remember to weigh the mixing bowl before you started, right?) and colour each bowl differently. Add each colour to a different tin (I only had two tins so I had to do mine in batches) and bake in the oven for 25 - 30 minutes. I baked mine two layers at a time, one on the middle shelf and one below it but off to one side. Once the top tin finished I moved the bottom tin up a shelf and had to bake for a further ten minutes or so. Bear in mind that once they're baked the outside of the cake layers might look a bit ... funky. Don't worry, the inside of the layers will be the correct colours!

Once all the layers are baked and cooled it's time to assemble your cake! I used a really simple buttercream icing for mine (125 grams dairy free margarine, add 400 grams icing sugar and beat well. Add 1 teaspoon of vanilla extract, beat until smooth and creamy) It's a slightly off-white colour because of the margarine, but it would probably work fine if you replaced the margarine with vegetable shortening. I needed two batches of this icing, one for between the layers and a crumb coat and one for the top coat and swirls. I probably have far too much on though because I actually ran out of icing towards the end.

Dairy Free Rainbow Cake by Feminist Cupcakes
Oops.
Put your first layer on the cake board or plate, cover with a layer of icing, place the next layer on top. Repeat until all layers have been added, and apply a thin coat of icing all over the cake as a crumb coat (to stop crumbs getting into your top layer of icing). Refrigerate the cake while you make up the next batch of icing to let the crumb coat firm up.

For the outer layer of icing I added a little more on top on the crumb coat and then used a number 8 PME star nozzle to pipe swirls all over the cake.

I did have some problems with this cake. The layers were very thin, so they went rather hard and crispy round the edges and I ended up having to trim them. I think next time I make this I'll use one and a half times the recipe, or possibly even double it. If I double it, I'll keep the temperature at GM3, but for one and a half I'd probably turn it down to GM 2 and bake for a bit longer.

The important thing is that it tasted great, crispy bits and all, and Adam is already looking forward to his birthday cake!


Dairy Free Rainbow Cake by Feminist Cupcakes

Dairy Free Rainbow Cake by Feminist Cupcakes


Tuesday 8 January 2013

Lego: organising and storing

Everyone knows that unexpectedly standing on Lego hurts. It's therefore a massive pain in the arse that the stuff resists organising. No matter how much space you devote to it, it still ends up overflowing onto the floor and rattling up the vacuum cleaner. Despite knowing that I was fighting a losing battle I spent the week or so after Christmas sorting and organising Adam and Jack's Lego collection. I haven't bothered before now because it was only Adam collecting it, but when they got five Lego sets between them for Christmas this year I knew I would have to do something about it.

I really wish I had taken photos of how it looked before, but I don't have a great capacity for public humiliation so it's probably a good thing I don't. They had two of these boxes from Ikea full to the brim, which obviously meant that the pieces kept falling out through the handle holes, and a slightly smaller plastic box also full. Their instruction books were stuffed in another box and getting ripped and lost, it was just a giant mess.

The first thing I did was to sort the bricks, mostly by colour. I put all the red bricks in one box, green in another, blue in another.

Lego: organising and storing by Feminist Cupcakes

That was when I realised that I didn't have enough boxes for every category that I wanted. I ended up mixing black and white, yellow and orange, and dark and light grey.

Lego: organising and storing by Feminist Cupcakes

Lego: organising and storing by Feminist Cupcakes
Photography skillz: I has none.

I still didn't have enough boxes. Dammit. I ended up putting the rest of the bricks into separate plastic bags in the top of the boxes as a temporary solution.

In case you're wondering how long it took me (us actually, Andy and Adam helped. Jack mostly got in the way) to sort all this, we did seven hours the first two days and three hours on the third day. Yes, 17 hours of nothing but sorting Lego bricks. It's a good thing I don't care what my nails look like at the moment. (A word of advice on the nails thing. If you're going to do this, wait until after you've finished sorting to trim your nails. I did it after the first day and couldn't separate any bricks afterwards.)

It took about a day to realise that the plastic bags would have to be a very temporary solution when the bag with the pink and purple bricks leaked into the red box. I decided that I'd have to use bags because we simply don't have the space for any more furniture in their bedroom, so I figured I'd make some drawstring bags. People who actually know me in real life may be laughing their asses off right now because I don't do sewing. Seriously, I don't think I've ever even sewn on a button before (shut up, I know that's pathetic.) So, after yet another trip to Ikea (I think 95% of our stuff comes from there) to get a sewing machine and some fabric, and a quick read through of these sewing tips for beginners I started to make my bags.

Lego: organising and storing by Feminist Cupcakes

The first thing I learned was to sew the channel for the drawstring before sewing the sides together. Once I got the hang of it they really didn't take very long. Of course they're not perfect but I'm pretty pleased with them.

Lego: organising and storing by Feminist Cupcakes
I said they weren't perfect. At least this goes on the inside.

Lego: organising and storing by Feminist Cupcakes
Ignore the dingy carpet. Please. It's gross.

Andy very kindly did the drawing on the bags to show which bricks are inside.

Lego: organising and storing by Feminist Cupcakes

The last thing to do was organise the instruction books, which I did by putting them in plastic pockets in large ring binders.

Lego: organising and storing by Feminist Cupcakes

Lego: organising and storing by Feminist Cupcakes

So my floors are now Lego free and I can walk around barefoot again. I'll let you know how long it lasts.

Lego: organising and storing by Feminist Cupcakes

Lego: organising and storing by Feminist Cupcakes

Lego: organising and storing by Feminist Cupcakes